
How to grow & care for horseradish
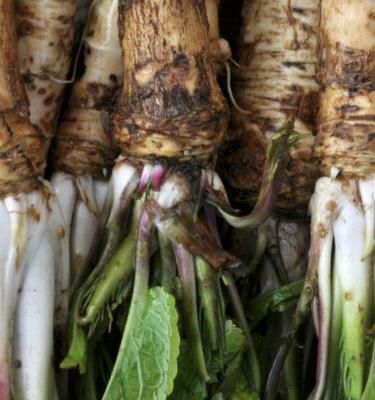
Horseradish is a vigorous plant related to broccoli, cabbage and kale - but unlike its brassica cousins, horseradish is grown for its hot and peppery root. Horseradish is really easy to grow, too easy in fact! Thanks to its strong spreading root (or rhizome) horseradish can quickly takeover your garden so it’s best to grow it in a pot or contained garden bed.
Horseradish will grow in most climates of Australia, except for the most tropical regions.
Top 5 steps to growing horseradish
- Grow horseradish in a pot or contained garden bed so that it doesn’t take over and become an invasive weed.
- Horseradish is easily grown from root cuttings or potted plants.
- Grow horseradish in a full sun to part shade spot with a moist, free draining soil.
- Horseradish foliage dies back completely over winter, but returns in spring.
- Allow your horseradish to establish for one or 2 seasons before harvesting.
Shopping List
- Horseradish root cuttings or a potted horseradish plant
- Scotts Osmocote® Compost Premium Soil Improver
- Scotts Osmocote® Controlled Release Fertiliser: Tomato, Vegetable & Herb
- If growing from cuttings or in pots, Scotts Osmocote® Plus Organics Tomato, Vegetable & Herb Potting Mix and a suitable pot
- Garden trowel
- Mulch
- Defender™ Snail & Slug Pellets
Prepare
Horseradish prefers a full sun to part shade spot in a moist, but free draining soil. Because of its vigorous growth and ability to takeover garden beds - it should ideally be planted in a pot or contained garden bed space.
Mix a small amount of Scotts Osmocote® Compost Premium Soil Improver and Scotts Osmocote® Controlled Release Fertiliser: Tomato, Vegetable & Herb through the original soil at the base of the planting hole.
Planting in the garden
If planting horseradish into your garden make sure it’s in a contained space or seperate garden bed as it can easily takeover! Mix a small amount of Scotts Osmocote® Compost Premium Soil Improver and Scotts Osmocote® Controlled Release Fertiliser: Tomato, Vegetable & Herb through the original soil.
Plant horseradish into prepared soil by removing it from the nursery pot and placing it into the centre of the planting hole. Water it in well and mulch around the plant to retain moisture.
Alternatively - plant horseradish root cuttings into prepared garden soil, making sure the rhizome (root) is buried beneath the soil, but the growing tips or shoots sit just proud of the soil surface.
Let your new horseradish plant establish for one to 2 seasons, before you begin to dig up roots to harvest. The leaves are also edible - they have a much milder peppery flavour and can be added to salads or cooked.
Planting in pots
It’s recommended you grow horseradish in pots to keep its vigorous growth contained. Horseradish will grow in medium to large pots at least 40cm wide by the same depth.
Fill the pot with Scotts Osmocote® Plus Organics Tomato, Vegetable & Herb Potting Mix, before removing the horseradish plant from its nursery pot and planting into the prepared pot. Water it in well and add a light layer of open organic mulch to retain moisture.
If growing from root cuttings, making sure the rhizome (root) is buried beneath the potting mix, but the growing tips or shoots sit just proud of the surface.
Harvest & Maintenance
Horseradish roots can be harvested in late autumn or early winter after the plants been allowed to establish for 1 or 2 seasons. Carefully dig the clump up or remove the clump from its pot and divid the clump up. Replant any root cuttings you’d like to continue growing.
Horseradish doesn’t need a lot of fertiliser, but will benefit from a dose of Scotts Osmocote® Controlled Release Fertiliser: Tomato, Vegetable & Herb in spring.
Wash and peel the horseradish roots - the flesh is most pungent and strong when fresh, it can be used grated or sliced and added to salads, served with meats or made into sauces. Horseradish can also be used to make preserves like mustards and pickles.
Pests & Diseases
Horseradish is rarely attacked by pests or diseases. If slugs and snails become a problem use beer traps (saucers filled with beer) or sprinkle Defender™ Snail & Slug Pellets around your plants.


