Drinking your own homegrown homebrew with friends and family is a fun and rewarding experience, and always a talking point. However, it can be challenging and a little frustrating to produce a glass of beer that tastes good. How do you do it and what equipment might you need? Here's a short guide on how to make home-grown homebrew.
Home brewing equipment
Open any book, or log onto any website that covers home brewing and you are likely to see a list of home brewing equipment as long as your arm. However, the good news is that not everything is needed to get started on your first pint. The key initial pieces of equipment should include the following 6 items, although a thermometer and funnel would be worth adding to the list:
Steriliser
Throughout the homebrew making process sterilising is essential to making sure that all equipment is clean and bacteria-free. There are a host of different varieties of steriliser on the market from powders to liquids. All equipment should be thoroughly sterilised before use.
Fermenting bin (with lid)
The fermenting bin is where the magic happens in home brewing; where yeast converts sugar into alcohol. Fermenting bins for home brewing come in all sizes, from 5 litres to 60 litres. A 25-litre fermenting bin will produce 40 pints of beer. An airlock (through which the generated CO2 can escape) isn't an essential part of a fermenting bin, but you may find it helpful to have one.
Paddle
The paddle is a special flat spoon to stir your homebrew. The paddle will ensure that all ingredients are well mixed whilst the holes in it help to reduce the amount of gas present. Paddles can be made from wood, plastic or metal. Metal is the preferred material as it is easy to sterilise and won't snap.
Trial jar
A trial jar is a tall thin graded jug in which to test the fermenting liquid with a Hydrometer to see if fermentation has completed. A trial jar is usually made of clear plastic or glass and will definitely bring out the mad-scientist in you! Remember to throw away the sample after testing otherwise it could contaminate the rest of the brew.
Hydrometer
Essentially the hydrometer will confirm if fermentation has ceased and whether your homebrew is now ready for bottling (or drinking). A hydrometer is a weighted glass instrument that floats in liquid, it measures the density of your brew. Take hydrometer readings at the start of the fermentation process and you will see the measurement decrease as the sugars turn to alcohol. Take readings at both the beginning and the end of the process and you will be able to work out the alcohol content of your brew.
Syphon
A syphon is needed when it comes to testing the homebrew during the fermentation process, minimising the risk of contamination. Essentially a long plastic tube, the syphon will allow you to get a sample from the fermenting bin into the trial jar, with a minimum amount of spillage and waste, ready to take a hydrometer reading.
Home brew kits
There are many homebrew kits available to get started in home brewing and sell from around £25 each. The kits include all the basic home brewing equipment required, ingredients and instructions, and can be bought at a wide variety of outlets from supermarkets to etailers. The choice is huge as to what type of homebrew to make: beer, lager, wine, cider and all the different variations in each group and so is very much personal preference. Kits are a great way of getting a value-for-money introduction to this fascinating hobby.
Homebrew ingredients
To make your own pint of beer surprisingly few ingredients are required and they are simply:
- Water
- Malt Extract
- Yeast
- Sugar
The ingredients are all supplied in the correct quantities when purchasing a homebrew making kit, along with all the required equipment, which is great for beginners as there is little initial outlay.
What is malt extract?
Out of all the ingredients required to make a pint of beer the one that will be a mystery is the malt extract. Essentially this provides the colouring and flavouring for your homebrew and there are a huge array of extracts on the market. Malt extracts are produced from malted barley by grinding the grains, mixing with water and heating. This process allows the natural enzymes in the grain to convert the starches into fermentable sugars. The final product is a viscous, sweet malt extract.
Homebrewers are able to create their own wort by following the All Grain Brewing method, in effect producing their own malt extract, but this does add extra steps to the process and additional ingredients and equipment would be required.
Home-grown homebrew ingredients

For the more adventurous among us, some of the ingredients that give beer its flavour can easily be homegrown, although additional equipment will be required to use these homegrown ingredients in your homebrew.
Hops (Humulus Lupulus)
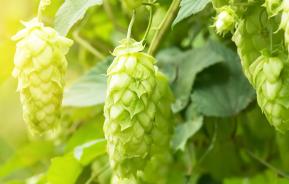
Traditionally hops give beer its flavour and range from spicy warm tones to sweet honeyed flavours. They don’t require much land and can be grown in large pots, so ideal for container gardens. However, be warned as hops do need a vertical growing space of between 8 and 25 feet!
Hops are perennials, so will return year after year and they generally reach maturity after 3 years. They will flower from year 1, so your first glass of home-brew can be poured after the first harvest.
It is best to purchase hops between November and April as dormant bare-root Rhizomes. Buy your rhizomes from a reputable dealer (such as Willingham Nurseries) to reduce the risk of spreading non-native diseases.
For more detailed information on growing hops read our "How to Grow Hops" Guide.
Additional homebrew flavourings
Beer can be brewed and flavoured with or without using hops try replacing them or complimenting them with the addition of herbs such as rosemary or plants like heather. Alternatively, additional flavourings can be added to your homebrew to give a more unique flavour, fruit flavourings such as black currant and raspberry are particularly popular. Recipes can be found readily online.
How to make your homebrew
Now that you have all your ingredients and your initial equipment sorted it is time to make your first barrel of beer. If you have purchased a complete home brewing kit instructions will be included and we would recommend following them. If you have gathered all the necessary equipment yourself then you may not have instructions so here goes:
Step 1: Wash and sterilise all of your equipment
It’s important to sterilise all equipment to prevent bacteria and impurities from contaminating the batch.
Step 2: Start Brewing!
- Pour 10 litres of cold water into the fermenting bin.
- Bring 7 litres of water to boil on the hob. Add one can of malt extract and simmer (uncovered) for 20 minutes.
- Add the sugar and stir to dissolve. As soon as it's dissolved, add to the water in the fermenting bin. Pour quickly to add as much air as possible to the liquid.
- Add another 5 litres of water (cooled, boiled tap water is fine).
- Sprinkle in the yeast and stir well with the paddle.
- Rest the lid on the top of the fermenting bin and leave for 24 hours. This will allow initial CO2 to escape relatively easily with no explosions!
- The lid can then be left loose or can be sealed and left for 6-10 days for fermenting to take place.
The room temperature should be between 16 and 20 degrees Celcius. After 6 days test a sample of the homebrew in a trial jar with the hydrometer. The hydrometer reading should be around 1.008 for dark beers and between 1.010-1.015 for light ales.
Step 3: Bottle your beer!
Place the fermenting bin on a table and, using the syphon, bottle your beer. Try not to disturb the sediment at the bottom of the fermenting bin and always leave a breathing space at the top of the bottle. Your beer will taste better if left to settle in the bottles for a couple of days.
Home-brewed beer isn’t the only beverage you can grow yourself. Why not give non-alcoholic Elderflower ‘Champagne’ a whirl?
Have you tried making Cider from your apple windfalls? Do you have a good recipe for herb beer? Have you tried growing, and harvesting hops?

